Tutorial - create a recipe
In this tutorial, we will demonstrate the use case of a Real Time Trigger from Google Drive, which notifies us that a new file has been added to a specific folder within our Google Drive account. Once a file is added, we will use the file contents sent by Google Drive to our Trigger output to create an asset in Tenovos using that file. We will also apply some metadata to the asset. When the asset has been created in Tenovos, we will send a message to a dedicated channel in Slack. Lastly, we will implement proper error handling and retry logic.
What you'll need
For this tutorial you’ll need the following things:
- A Google Drive account
- A Slack account
- At least one folder in your Google Drive account
- A file (or several) to add to your folder in Google Drive
- Your Tenovos API Key
- Your Tenovos user credentials (NOTE: Most customers will use a dedicated account for API connections.)
- Confirm the Tenovos Connect role privilege is enabled for your user role in Tenovos DAM.
NOTE: We recommend using non-production accounts for building and testing your recipe.
Once you’ve gathered everything you need, you can begin creating your first recipe!
Setting up your project(s)
Before we get started creating your first recipe, it’s important to govern how you structure your connections and recipes within Tenovos Connect. Following the below example structure will ensure that you know exactly where to find everything you need that is specific to each integration.
Within your Tenovos Connect instance, you’ll be able to create projects. Projects are an organizational tool that allow you to organize your connections and cecipes. Below we show a sample project structure for an organization that has integrations spanning multiple different categories of software.

This structure makes it easy to find the connections and recipes for any given integration, and will allow Tenovos Services and/or Support to better understand where to find things should you require assistance.
Step 1. Create your project
To create your project:

- Log into Tenovos as an administrator (or a role with the “Tenovos Connect” role privilege) and navigate to Admin > Connect. Then click Projects.
- In the Projects screen, click Create project. This project is where you’ll create and save your connections and cecipes.
- In the Set up a new project screen, enter the Project name (“My first project”) and optional Project description, then click Create project. Your new project is displayed.
- Within your new project you can add additional folders by clicking the Create folder button in the middle of the screen. Go ahead and add two new folders called “Connections” and “Recipes”. This will help you maintain a strong taxonomy within your projects!
Step 2. Create your Connections
For this Getting Started, you’ll create (1) a connection to Google Drive, (2) a connection to Tenovos and (3) a connection to Slack. This allows you to simply select them for use when you build your recipe.
Connecting to Google Drive
This step allows Tenovos Connect to connect to your Google Drive account.
-
From within the Connections folder of your project, click the Create menu and choose Connection to open the New connection screen.
-
Using the search bar, search for Google Drive and select it. The Connect to Google Drive screen opens.
-
Enter your Google Drive connection details.
- Connection name = My Google Drive connection
- Location = My first project > Connections
- Authentication type = OAuth 2.0
- Leave Advanced settings and Custom OAuth profile as-is, these are only required for custom authentication methods which we will not be using.
- Click Sign in with Google and use your Google credentials to log in and Allow Tenovos Connect to connect to your Google account.
-
After a successful login, the connection definition screen displays Connected, highlighted in green.
Connecting to Tenovos
This step allows Tenovos Connect to connect to your Tenovos account.
-
From within the Connections folder of your project, click the Create menu and choose Connection to open the New connection screen.
-
Search for Tenovos and select it. The Connect to Tenovos screen opens.
-
Enter the Tenovos connection details for the Tenovos environment of your choice. When creating recipes, we always recommend using a non-production account.
- Connection name = My Tenovos Connection
- Location = My first project > Connections
- Authentication type = Standard
- API Key = Contact Tenovos Customer Success for this information if you do not have it.
- Site name = The base URL of your API connection.
NOTE: Tenovos API v1 and v1.5 have different base URLs. - Username = The username used to login to Tenovos DAM.
- Password = The password used to login to Tenovos DAM.
-
After a successful login and connection, the connection definition screen displays Connected, highlighted in green.
Connecting to Slack
This step allows Tenovos Connect to connect to your Slack account.
-
From within the Connections folder of your project, click the Create menu and choose Connection to open the New connection screen.
-
Search for Slack and select it. The Connect to Slack screen opens.
-
Enter your Slack connection details.
- Connection name = My Slack Connection
- Location = My first project > Connections
- Leave Advanced settings and Custom OAuth profile as-is.
- For this simple recipe, you do not need to modify them.
- Click Connect and specify the Slack account you would like to use. Allow Tenovos Connect access to your Slack account.
-
After a successful login and connection, the connection definition screen displays Connected, highlighted in green.
Step 3. Create your recipe
In this step, you’ll create your recipe in the “Recipes” folder of your project.
-
In the navigation breadcrumbs, click My First Project to return to its screen.
-
Click the Create menu and choose Recipe to open the Set up your Recipe screen. Then enter the following:
- Name: My first Recipe
- Location: My first project > Recipes
-
Next, you will be asked to pick a starting point. Since our example recipe should begin when a new file is added in a Google drive folder, our starting point will be to Trigger from an app.
Click Start building. This will open the recipe editor.
You can now start building your recipe! The next step is to set up the trigger that will start the recipe.
Step 4. Define the trigger
We want this recipe to run when it is triggered by an app—specifically, when new files are added to a Google Drive folder.
To define this “New file or folder” trigger, you’ll specify the App triggering the recipe, the Trigger that will need to be met for the recipe to start, the application Connection to use, and finally, Setup the trigger by providing additional information to target the trigger. Navigation links at the top of the recipe editor’s right-hand panel show you where you are in this process.

-
Select the App.
In the right-hand panel, choose Google Drive from “Your Connected Apps.” If Google Drive is not present in “Your Connected Apps,” search for it using the search bar above it. When selected, Google Drive is added as a trigger in the recipe workflow on the left hand side of the screen. Now, advance to selecting the Trigger event. -
Select the Trigger event.
Since our example recipe should begin when a new file is added in a Google Drive folder, our trigger event is New file or folder. Now, advance to selecting your Connection. -
Select the Connection for this trigger.
Use the connection you created earlier called My Google Drive connection. Now, advance to setting up your trigger details. -
Setup the trigger details.
In the Folder section, leave the default selection of “Select folder.” This selection allows you to explore your Google Drive folder schema to find and select the Google Drive folder you would like to monitor for new files. (NOTE: Should a user want to identify a folder using a folder ID, that user could click “Select folder” and choose “Use folder ID” instead.) Then click Select a value and navigate to the folder you would like to monitor for new files. -
For the start date and time, enter today’s date and a time earlier than now. Or you can leave it empty and the recipe will default to one hour ago.
-
Additionally, if you only wanted your recipe to run when the new files detected in the Google Drive folder met a certain criteria, you could define that criteria by toggling on Set trigger condition. For now, we will leave Set trigger condition toggled off.
-
Save your work so far.
In the following steps, you’ll define the Actions for your recipe.
Step 5. Define the Actions
In following steps, you’ll define the Actions for your recipe. For this example recipe, you’ll define two Actions:
For each Action, you’ll specify the App being leveraged to perform the Action, the Action being taken using the selected application, the application Connection to use, and finally, Setup the Action by providing additional information necessary for the recipe step.
Action 1: Create and upload an asset in Tenovos
-
In the recipe editor’s left-hand panel, under Actions, click the + sign to open the list of Actions.
-
In the Actions list, choose Action in app.
-
In the right-hand panel, choose the connected app Tenovos. This updates the Action in the workflow to display the Tenovos icon and then you advance to the Action settings.
-
For the Action, choose Assets – Create and upload an asset.
This tells Tenovos Connect to upload the files it just retrieved from your hot folder.IMPORTANT: Make sure you choose “Assets – Create and upload an asset.” Don’t choose “Assets – Create an asset”! Choosing the action “Assets – Create an asset” will result in creating a metadata-only asset.
-
For the Connection, choose the one you created earlier: “My Tenovos connection.”
-
Finally, in the Setup panel, configure the Action:
-
Select a simple Metadata template to apply to the assets that are added to Tenovos.
IMPORTANT: For this recipe, choose a metadata template without any required fields.
-
Select a Security template to apply to the assets that are added to Tenovos.
-
Specify the Asset file name data to use. To do this, you’ll tell Tenovos Connect to use the Name of the file that was added to Google Drive (in the trigger event).
-
Click the Asset file name field to place the cursor in it and open the Recipe data options panel.
-
Then under New file or folder | Step 1 output, click the Name data pill to add it to the Asset file name field. (You can also drag it to the field.)
-
Specify the Filesize data to use.
-
To do this, you’ll tell Tenovos Connect to use the Size of the file that was added to Google Drive (in the trigger event output).
-
Click the Filesize field to place your cursor in it, open the step 1 output option, then search for and click the Size data pill.
NOTE: It’s faster to search for the Size data pill because it’s near the bottom of the Step 1 output data tree. (Make sure the Size data pill you select is part of the New file or folder | Step 1 output data tree!)
-
-
-
Specify the File Contents data to use. (This is the content of the file that was uploaded to Google Drive).
Click the File Contents field to place your cursor in it, then expand the New file or folder | Step 1 output data tree and click the File contents data pill. It is added to the File Contents field.
-
-
When you’ve added all required settings for this second action, the right-hand panel will look like this:
-
Scroll to the top of the screen and Save the recipe.

Action 2: Post a message in Slack
-
In the recipe editor’s left-hand panel, under the Create and Upload to Tenovos action, click the + sign to open the list of Actions.
-
In the actions list, choose Action in app.
-
In the right-hand panel, choose the connected app Slack.
This updates the action in the workflow to display the Slack icon and then you advance to the Action settings. -
For the Action, choose Post Message.
-
For the Connection, choose the one you created earlier: “My Slack connection.”
-
In the workflow, the action is updated to display “Post message in Slack.”
-
Finally, in the Setup panel, configure the action:
-
Select an available slack channel to post a message to. If it helps, create a new Slack channel that only contains yourself.
-
Specify the Basic Text. This will be the text that is displayed in the Slack message. For this example, let’s make the basic text say “A new asset has been uploaded to Tenovos. Filename: ”. Now, instead of “” after filename, let’s use our ‘Filename’ datapill from Step 2 output. When using the datapill, the Slack message will always display the filename of the asset that was just uploaded.
-
-
When you’ve added all required settings for this second action, the right-hand panel will look like this:
You have now built all the necessary actions that will be using connected applications. However, as with all integrations, we need to implement proper error handling and retry logic. That is what we will be building in the following steps.
Step 6. Define error handling steps
Ensure that your recipes run smoothly by implementing good error handling habits. Add all the actions that you want to monitor to the Monitor block. If errors are found in your actions in the monitor block, set up subsequent steps to handle those errors.
To define error handling steps:
-
In the recipe editor’s left-hand panel, under the Post message in Slack action, click the + sign to open the list of Actions.
-
In the actions list, choose Handle errors.
-
When you click Handle errors, you will see that 4 new steps are added to your recipe. These are all steps added as part of the handle errors action.
-
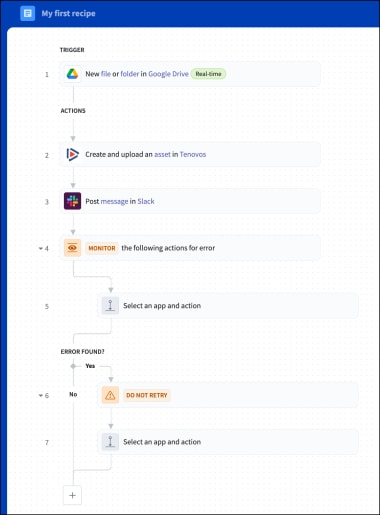
The first step of Handle errors (4th step in our recipe) indicates the beginning of the Monitor block.
All recipe actions contained within the monitor block will be monitored for errors. -
The second step of Handle errors (5th step in our recipe) is where you will add actions to be monitored by the monitor block. When a new Handle errors action is created, this step will display as an empty Select an app and action step. A common best practice is to wrap all recipe steps in the monitor block.
-
The third step of Handle errors (6th step in our recipe) specifies how many times the recipe should retry the actions in the monitor block if an error is found, before proceeding to the next recipe action.
NOTE: This step will only be performed if an error is found in the monitor block.
-
The fourth step of Handle errors (7th step in our recipe) is where you will add actions to be performed if an error is found in the monitor block. When a new Handle errors action is created, this step will display as an empty Select an app and action step.
NOTE: This step will only be performed if an error is found in the monitor block.
After adding your Handle errors action, your recipe should look similar to the image below.
-
-
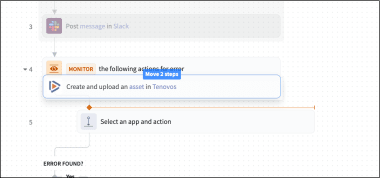
Now that we have the Handle errors action in our recipe, let’s add our Create and upload an asset to Tenovos and Post message in Slack actions to our monitor block.
-
To select these actions, move your mouse just outside the top left-hand corner of the Create and upload an asset to Tenovos action. Now click and drag your mouse to the bottom right-hand corner of the Post message in Slack action. The two steps should turn light blue, indicating that they are now selected.
-
To add these actions to your monitor block, with both steps still selected, click and drag the steps slightly above the empty Select an app and action step within the monitor block. While holding the steps slightly above the empty Select an app and action step, you should see an orange line appear –- this indicates that the steps can be dropped into place within the monitor block.
-
-
Your Create and upload an asset to Tenovos and Post message in Slack actions are now in your monitor block. However, you will now see an empty Select an app and action step that is leftover from the Handle errors action. Since we do not need this action, you can delete the action by hovering over the action, clicking the three dots to the right of the action and selecting Delete.
-
Now that we have completed adding our recipe actions to the monitor block, we will specify how many times the recipe will retry the actions in the monitor block if an error is found. Click on the action which says “Do not retry by default” to see more details.
-
After clicking the action, the right-hand side panel will expand and you will see a question that says “Retry actions in Monitor block?” This is where you will specify how many times the recipe will retry the actions in the monitor block. For our example, let’s set this value to Retry 1 time.
-
After selecting “Retry 1 time,” you will notice that you are prompted with another field called “Time interval between retries.” This is where you will select the amount of time to wait before retrying actions in the monitor block. For this example, set the interval to 3 seconds.
-
Finally, by setting the first field to “Retry 1 time,” and the second field to “3 seconds,”’ we are telling the recipe that if an error is found in an action within the monitor block, wait 3 seconds and then retry the actions in the monitor block one additional time before moving onto the next action in the error block.
-
-
Our retry logic step is now complete, which means we can move on to our final action, which will be to send a slack message to the same Slack channel that we send a message to in step 4 of our recipe, but this time, with an error notification and error message. This action will only be invoked if the retry logic results in more errors.
-
Define the Action: “Post a message in Slack”
-
In the recipe editor’s left-hand panel, under the "If error persists" message beneath our retry logic step, click Select an app and action to open the list of Actions.
-
In the actions list, choose Action in app.
This action carries out an operation in your connected app.-
In the right-hand panel, choose the connected app Slack. This updates the action in the workflow to display the Slack icon and then you advance to the Action settings.
NOTE: You created this connection in Connecting to Slack.
-
For the Action, choose Post Message.
-
For the Connection, choose the one you created earlier: "My Slack connection." In the workflow, the action is updated to display "Post message in Slack."
-
-
Finally, in the Setup panel, configure the action:
- Select an available Slack channel to post a message to. If it helps, create a new Slack channel that only contains yourself.
- Specify the Basic Text. This will be the text that is displayed in the Slack message. For this example, let's make the basic text say the following: Recipe ____ has not completed due to errors. Error Message: "_______".
-
When you've added all required settings for this second action, the right-hand panel will look like this:
-
Step 7. Test the recipe
Now that you’ve created, configured, and saved your recipe, you’re ready to test it!
But, before we test the recipe, it is important to understand the difference between testing a recipe and starting a recipe. Let’s take a quick look at the difference between the two actions.
-
Testing a recipe. The Tenovos Connect recipe test mode ensures your recipe’s behavior and data processing are correct. In test mode, the recipe will check for a new Trigger event, but will only process the first job received. This allows you to review the functionality of your recipe without consuming more tasks than necessary. Upon completion, the test job is logged in the recipe’s job history where its details are available for your review.
To enter “Test mode,” click Test Jobs at the top of the screen or Test recipe in the top right-hand corner.
-
Starting a recipe
When a recipe is started, it is considered active. Active recipes will detect all new trigger events and will process each event as a job. Once a recipe is started, all processed jobs are logged in the recipe’s job history where job details are available for your review.
To test your new recipe:
-
Open your recipe in the recipe editor. (Navigate to Projects > My first Project > My first Recipe.)
-
Click the dropdown next to the Start recipe button in the top right-hand corner, then select Test recipe.
When you choose to Test Recipe, the recipe will check for a new trigger event. For this recipe, if it doesn’t find a new file in Google Drive, the recipe will continue to wait until it finds one—or until you choose to Cancel job, Stop test or Exit.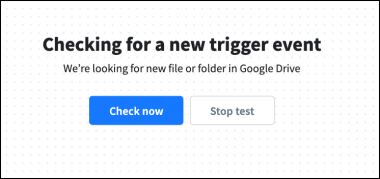
-
Now that the recipe is awaiting a trigger event, navigate to the Google Drive hot folder you selected in your recipe trigger.
-
Upload an image file to this folder. Shortly, your recipe will detect the new file as a new trigger event.
-
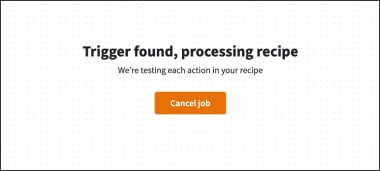
When it detects the trigger, it executes the recipe by processing each action in the recipe.
-
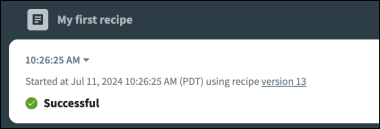
When Tenovos Connect completes the test, you’ll see a Successful banner message.
-
To repeat the job with the same data and view the test sequence of events again, click Repeat job in the banner message area. Repeating a job will use the same trigger event as the first time the test was performed, but will always use the most recent recipe version.
NOTE: If the job was successful, there is no need to repeat the job. Repeating a job is most often used following fixing an issue with the recipe, optimizing a recipe or making enhancements to a recipe when initiating a new trigger event is not required.

-
To see the test job details including a start time and description, click the timestamp arrow to expand the display.

-
-
Upon receiving a successful test notification, navigate and login to the Tenovos Environment that you used when creating the connection called “My Tenovos Connection.” If your recipe test was successful, the file that you uploaded into your Google Drive folder should now appear in your Tenovos Content gallery!
Congratulations! You’ve created a Tenovos Connect recipe that creates an asset in Tenovos and then sends a notification message to a dedicated channel in Slack.