Configurations administration
In Admin, the Configurations tab allows administrative users to customize images, colors, and terminology in the Tenovos UI. You can also specify the default landing page and how content is displayed.
The Configurations tab includes four pages:
Access to the Configurations tab is available to administrative users with the Configuration Management role privilege.
Admin > Configurations > Branding > Images & Color:

Branding
In Admin > Configurations, the Branding page allows you to customize images, colors, and terminology in the Tenovos UI.
The Branding page has two sections, Images & Color and Terminology. In the Terminology section, you can replace the default menu names. In the Images & Color section, you can customize:
-
Nav Bar Logo. The main logo displayed in the top left of all pages. Must be a JPEG or PNG with minimum dimensions of 826x188 pixels and a maximum file size of 20 MB.
-
Login Logo. The image above the login form; usually a larger variation of the Nav Bar logo. Must be a JPEG or PNG with minimum dimensions of 826x188 pixels and a maximum file size of 20 MB.
-
Login Banner. The image or video displayed on the right hand side of the login page. Must be a JPEG, PNG, or WEBM file with minimum dimensions of 2048x2018 pixels and a maximum file size of 20 MB.
- Search Banner. The image displayed behind the search bar on the default Home page. Must be a JPEG or PNG with minimum dimensions of 7350x1500 pixels and a maximum file size of 20 MB.
- Favicon. The fav icon displayed in the browser tab. Must be an ICO file with a minimum resolution of 64x64 pixels and a maximum file size of 20 MB.
-
Accent Color. The color of hyperlinks and action buttons.
-
Asset Details Page Background Color. The color displayed behind assets on the asset details page and the new grid view.
Preview a branding image or video
To preview a branding image or video:
-
Navigate to Admin > Configurations > Branding > Images & Color.
-
Locate the image or video.
-
Branding image. Click the image to expand it. Use the +/- buttons to zoom in and out. Click the X to close the preview.
-
Branding video. Click the video Play button to view it. Click the Pause button to stop the video play.
-
Replace a branding image or video
To replace a branding image or video:
-
Navigate to Admin > Configurations > Branding > Images & Color.
-
Locate the item to rebrand, either the Nav Bar Logo, Login Logo, Login Banner, Search Banner, or Favicon.
NOTE: Supported file types, dimensions, and sizes are listed in Branding and in the Tenovos UI. -
Click Replace.
-
Select the replacement file, then click Upload.
When the upload is complete, a confirmation message appears at the top of the screen. -
Changes are saved automatically. Refresh your browser to see configuration updates.
Customize branding accent color
To customize the accent color of hyperlinks and action buttons:
-
Navigate to Admin > Configurations > Branding > Images & Color.
-
Scroll down to the Accent Color option.
-
Input a HEX color code in the field, or click the color swatch to open the color picker.
When using the color picker, you can click in the color palette to adjust lightness and saturation, and use the sliders to select hue and opacity. You can also input a HEX color code, then adjust its opacity using arrow keys, clicking arrow buttons, or by typing a percentage into the opacity field.
-
Changes are saved automatically. Refresh your browser to see configuration updates.
Customize asset details page background color
To customize the aseet details page background color:
-
Navigate to Admin > Configurations > Branding > Images & Color.
-
Scroll down to the Asset Details Page Background Color option.
-
Input a HEX color code in the field, or click the color swatch to open the color picker.
When using the color picker, you can click in the color palette to adjust lightness and saturation, and use the sliders to select hue and opacity. You can also input a HEX color code, then adjust its opacity using arrow keys, clicking arrow buttons, or by typing a percentage into the opacity field.
-
Changes are saved automatically. Refresh your browser to see configuration updates.
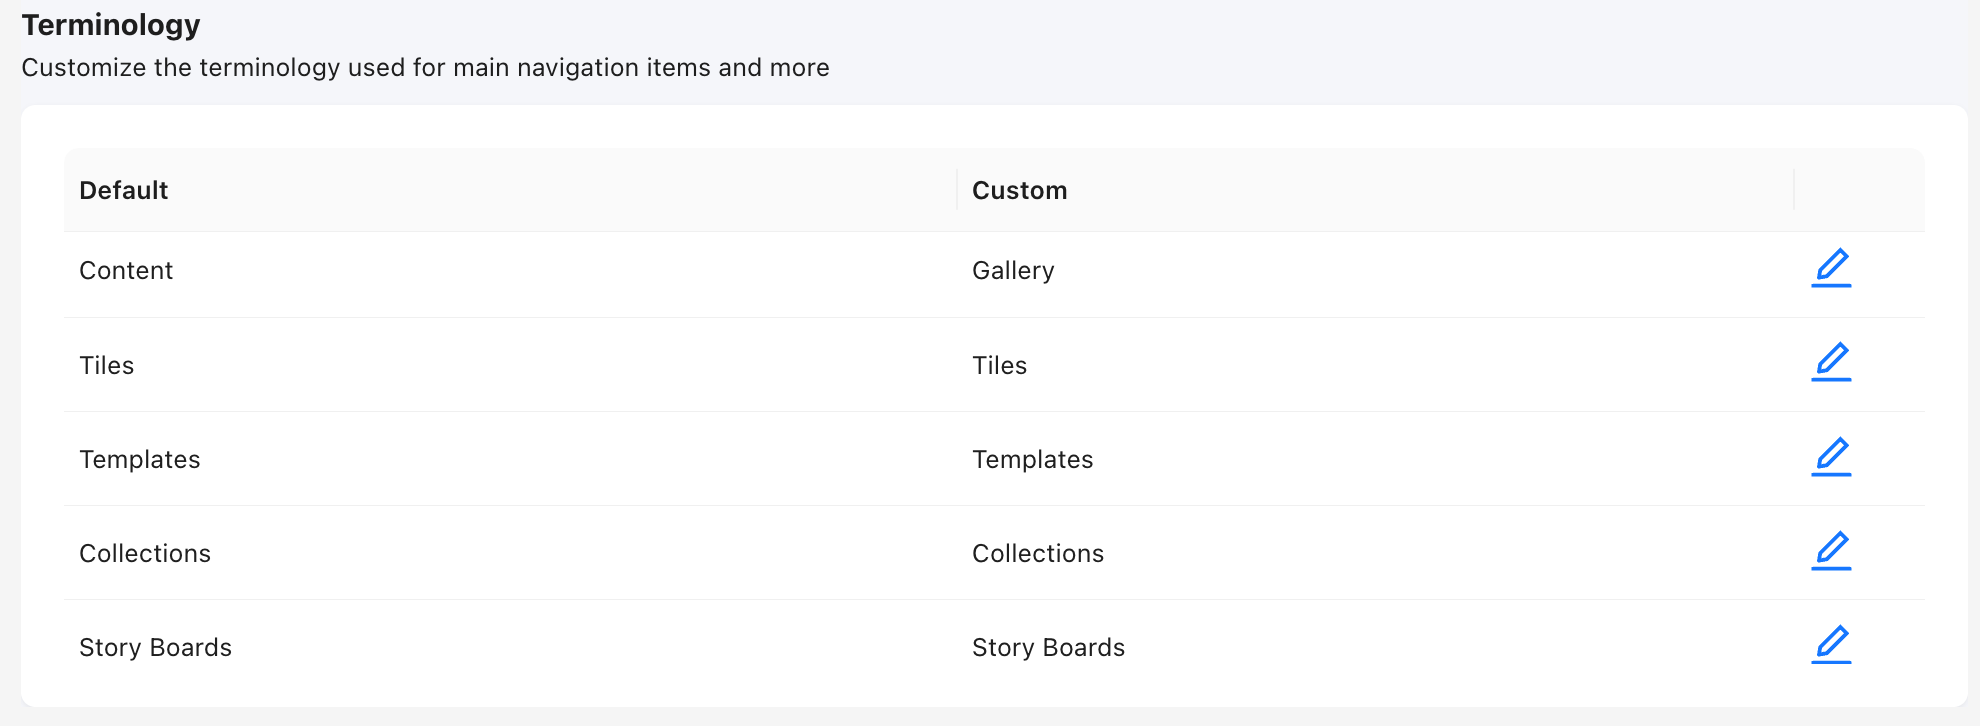
Customize branding terminology
You can replace the menu names in the main navigation bar, for example, Content, Collections, and Story Boards. Maybe "Story Boards" to "Vendor Boards."
Changing the terminology applies to all users. But they'll only see the tabs that their Role privilege allows them to see.
To customize branding terminology:
-
Navigate to Admin > Configurations > Branding > Terminology.
-
Locate the menu name to change and click its Edit icon.
-
Enter the new name.
noteThe Custom field cannot be empty.
-
Click the check mark to confirm changes. To cancel changes, click the X.
-
Changes are saved automatically. Refresh your browser to see configuration updates.
Page Layout
In Admin > Configurations > Page Layout, you can customize the Home Page after users login and how content is displayed. This includes the ability to:

Set default landing page
The landing page is the page users see after logging into Tenovos. The default is the Tenovos Home page, but you can replace it with options such as the Content gallery or Collections.
NOTE: When using Tenovos, you can return to the designated home page by clicking the Tenovos (or custom branded) logo at the top left of the screen.
To change the default landing page:
-
Navigate to Admin > Configurations > Page Layout.
-
Open the Default Landing Page dropdown menu and select the new default landing page.
-
Changes are saved automatically. Refresh your browser to see configuration updates.
Use landing page as home page
You can replace the default Tenovos Home page with the specified landing page. Note that setting the landing page to anything besides the Tenovos Home page removes all access to that page.
NOTE: To display the home page, click the Tenovos (or custom branded) logo at the top left of the screen.
To set the landing page as the home page:
-
Navigate to Admin > Configurations > Page Layout.
-
Click the Use Landing Page as Home Page toggle to enable it (button moves to the right).
-
Changes are saved automatically. Refresh your browser to see configuration updates.
Change default asset view
In Admin > Configurations > Page Layout > Views and Navigation, the Default Asset View Layout dropdown allows you to set the default layout style for Content gallery views of assets—either Grid, List, or Masonry.
To change the default Content gallery asset view:
-
Navigate to Admin > Configurations > Page Layout.
-
Click the Default Asset View Layout dropdown menu and choose, Grid view, List view, or Masonry view.
-
Changes are saved automatically. Refresh your browser to see configuration updates.
Display collections on the Home Page
The Tenovos Home page can include tiles and Featured Collections. The option to display collections only applies to the Tenovos Home page.
To display collections on the Home page:
-
Navigate to Admin > Configurations > Page Layout.
-
Click the Display Collections on Home Page toggle to enable it (button moves to the right).
-
Changes are saved automatically. Refresh your browser to see configuration updates.
Configure the size of Collections and Tiles on the Home Page
To configure the size of Tiles on the Home page:
-
Navigate to Admin > Configurations > Page Layout.
-
Click the Max Tiles Per Row dropdown. Select a number between 3-10 (this number indicates how many tiles will be shown on each row). A smaller number will result in larger tiles, and a larger number will result in smaller tiles.
-
Changes are saved automatically. Refresh your browser to see configuration updates.
To configure the size of Collections on the Home page:
-
Navigate to Admin > Configurations > Page Layout.
-
Click the Max Collections Per Row dropdown. Select a number between 3-10 (this number indicates how many collections will be shown on each row). A smaller number will result in larger collections, and a larger number will result in smaller collections.
-
Changes are saved automatically. Refresh your browser to see configuration updates.
Configure content to show by default on the Home Page
To configure whether Collections or Tiles are selected by default on the Home page:
-
Navigate to Admin > Configurations > Page Layout.
-
Click the Default Content View dropdown. Select Collections or Tiles (Or your preferred Terminology for Collections or Tiles). This selection indicates the content that will be show by default on the Home Page.
-
Changes are saved automatically. Refresh your browser to see configuration updates.
Configure the default Home Page theme
To configure if the default Home Page theme is Light or Dark Mode:
-
Navigate to Admin > Configurations > Page Layout.
-
Click the Default Home Page Theme dropdown. Select Light Mode or Dark Mode. This selection indicates the default Home Page theme.
-
Changes are saved automatically. Refresh your browser to see configuration updates.
Display the search bar on the Home Page
To configure if the search bar is shown on the Home Page:
-
Navigate to Admin > Configurations > Page Layout.
-
Click the Show Search Bar on Home Page toggle to enable it (button moves to the right).
-
Changes are saved automatically. Refresh your browser to see configuration updates.
Configure a role-based Welcome Message on the Home Page
To configure a welcome message on the Home Page:
-
Navigate to Admin > Configurations > Page Layout.
-
Next to the Welcome Message on Home Page configuration, click '+ New Message' to add a new message.
-
Type your message and select the user roles that should see this message.
-
Changes are saved automatically. Refresh your browser to see configuration updates.
Featured Collections
Featured Collections controls what collections are displayed on the Home Page, and the order which they are displayed.
Note: Up to 100 collections can be featured
How to re-order featured collections
On the Tenovos Home page, featured collections are displayed from left to right, as listed in the Admin > Configuration Administration > Featured Collections list, from top to bottom.
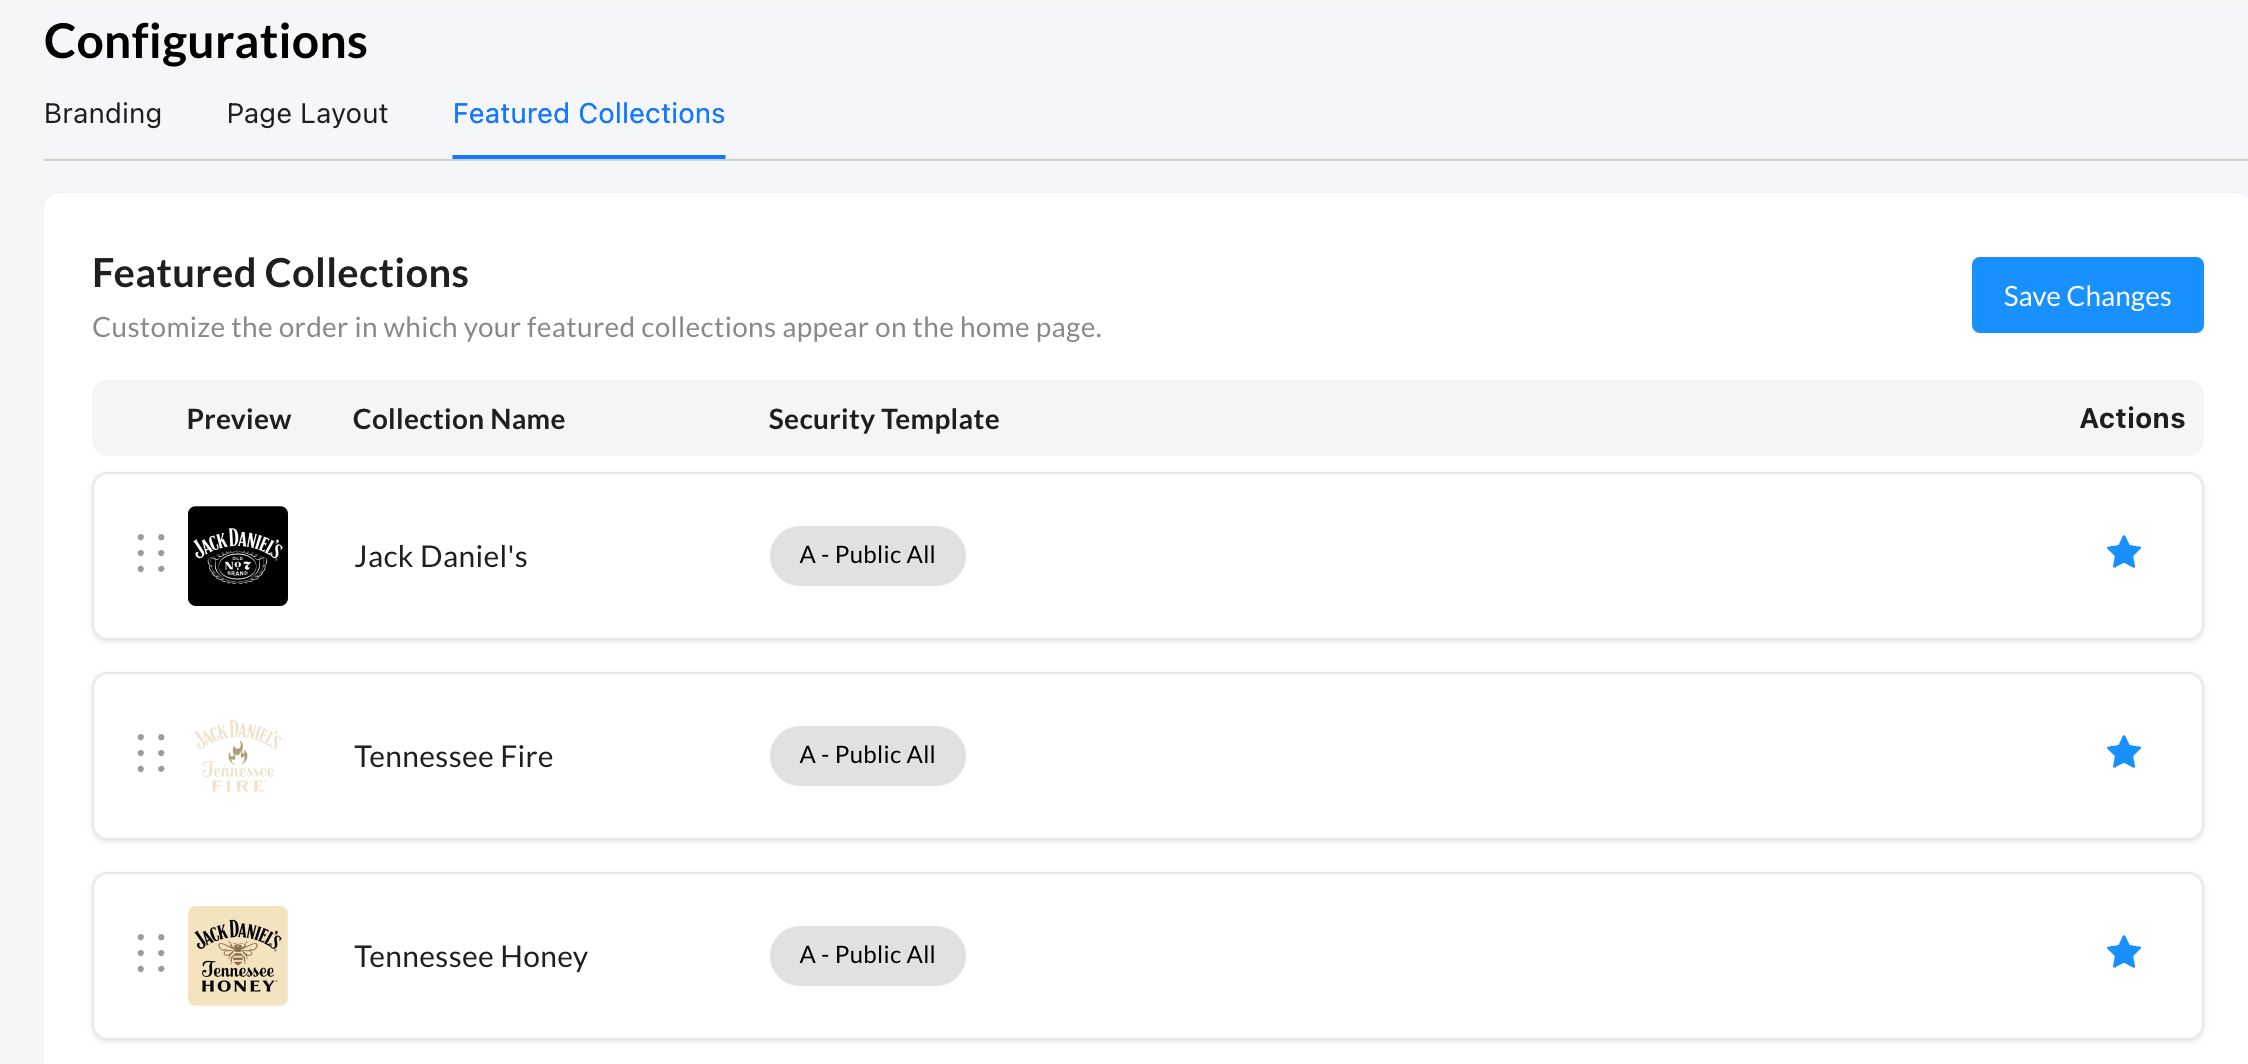
To re-order the Featured Collections displayed on the Home page:
-
Click, press, and hold a Featured Collection’s dot icon. Then drag the collection row to its new location.
Note that Save Changes is enabled after you move a collection.
-
Continue re-ordering the collections as necessary.
-
Click Save Changes.
Tenovos saves the new Featured Collection order and displays a confirmation message.
To remove Collections from the Home page:
-
Navigate to a Featured Collection's row.
-
Click the 'star' icon so it is no longer filled in.
Note that Save Changes is enabled after you deselect the star.
-
Click Save Changes.
Tenovos saves the new Featured Collection order and displays a confirmation message.
Filter Presets
Filter Presets is an administrative configuration feature that gives organizations control over which filter attributes appear in the filter panel — and in what order — based on a user's role. Instead of every user seeing the same full list of attributes, administrators can create curated, role-specific filter experiences that surface what is relevant to each team.
Filter Presets require the Configurations Management role privilege to create and manage. End users do not need to configure anything — the correct preset is applied automatically based on their role.
- Key concepts
- Filter Presets list
- To Create a Filter Preset
- To Set the Default Preset
- To Edit a Filter Preset
- To Duplicate a Filter Preset
- To Delete a Filter Preset
- Known Limitations
- FAQ
Key concepts
| Term | Description |
|---|---|
| Filter Preset | A named configuration that defines which filter attributes are shown to a user and in what order. |
| Default Preset | A designated fallback preset applied to any user whose role is not explicitly assigned to another preset. The Default Preset cannot be deleted without first reassigning the default to a different preset. |
| Facetable Attribute | A metadata attribute enabled for use in the filter panel. Only facetable attributes are available for selection when building a preset. |
| Role Assignment | Each preset can be assigned to one or more user roles. A single role can only be assigned to one preset at a time. |
| Open Filter by Default | A per-preset setting that controls whether the filter panel is open or closed when a user first loads the gallery. After that initial load, the user's last state is remembered in their browser. |
Filter Presets list
Navigate to Admin > Configurations > Filter Presets to view and manage all presets in your organization.
The Filter Presets list displays the following columns:
- Default — A radio button indicating which preset is designated as the fallback for users with no role-specific preset assigned. Only one preset can be the default at a time.
- Preset Name — The name of the preset. Click the name to open the preset in edit mode.
- Description — A short description of the preset's intended use.
- Roles — The number of roles assigned to the preset. Click to view which roles are assigned.
- Attributes — The number of filter attributes included in the preset. Click to view the attribute list.
- Actions — Icons for duplicating
 , editing
  , and deleting
  the preset.
To Create a Filter Preset
- Navigate to Admin > Configurations > Filter Presets.
- Click Create filter preset in the top right corner. A panel opens on the right side of the screen with four configuration tabs.
- On the Name tab:
- Preset Name: Enter a unique name for the preset.
- Open filter by default: Check this box if you want the filter panel to be open automatically when a user first loads the gallery under this preset. After the initial load, the user's last state will be remembered in their browser.
- Select the Description tab and enter an optional description to help other administrators understand the intent of the preset.
- Select the Roles tab and click + Add to open the role picker.
- Search for and select one or more roles to assign to this preset.
- A role can only be assigned to one preset at a time. If a role is already assigned to another preset, it must be removed from that preset before it can be assigned here.
- Click Save to confirm your role selections.
- Select the Attributes tab and click + Add to open the attribute picker.
- Search for and select the facetable attributes to include in this preset. A minimum of 1 attribute is required; a maximum of 50 attributes can be added.
- Once added, drag attributes using the handle on the left side of each row to set the display order.
- Click the remove icon to the right of an attribute to remove it from the preset.
- Click Save. The new preset will appear in the Filter Presets list.
At least one role and at least one attribute must be assigned before a preset can be saved.
To Set the Default Preset
The Default Preset is applied to any user whose role is not explicitly assigned to another preset, ensuring there are no gaps in filter coverage.
- Navigate to Admin > Configurations > Filter Presets.
- In the Default column, click the radio button next to the preset you want to designate as the default.
The selected preset is immediately set as the default and will serve as the fallback for all unassigned roles.
The Default Preset cannot be deleted. To delete it, first designate a different preset as the default by selecting its radio button.
To Edit a Filter Preset
- Navigate to Admin > Configurations > Filter Presets.
- Locate the preset you want to edit and click the pencil icon on the right side of its row. The preset panel opens on the right side of the screen.
- Make your changes across any of the four tabs — Name, Description, Roles, or Attributes.
- Click Save. Your changes are applied immediately and will be reflected the next time a user loads or refreshes the gallery.
To Duplicate a Filter Preset
Duplicating a preset is useful when creating a new preset that is similar to an existing one.
- Navigate to Admin > Configurations > Filter Presets.
- Locate the preset you want to duplicate and click the copy icon on the right side of its row.
A duplicate is created with the same name appended with "(copy)" and the same attribute configuration. No roles are assigned to the duplicate — you will need to open and edit it to assign roles and update the name as needed.
To Delete a Filter Preset
- Navigate to Admin > Configurations > Filter Presets.
- Locate the preset you want to delete and click the trash icon on the right side of its row.
- Confirm the deletion at the prompt.
The preset designated as the Default cannot be deleted. To delete it, first assign the default to a different preset, then return to delete it.
Known Limitations
| Area | Limitation |
|---|---|
| Attributes per preset | A maximum of 50 attributes can be added to a single preset. A minimum of 1 is required to save. |
| Role assignment | A role can only be assigned to one preset at a time. |
| User granularity | Filter Presets are role-based only. Per-user customization is not supported. |
| Attribute pool | Only facetable attributes are available for selection. Non-facetable attributes will not appear in the picker. |
| Security enforcement | Filter Presets control which attributes appear in the filter panel for UX purposes only. They are not a security or access control mechanism. Hiding a filter attribute does not prevent users from accessing assets tagged with that attribute. |
| Filter drawer state | The Open filter by default setting only affects the user's first gallery load under a given preset. After that, the user's last open/closed state is persisted in their browser. |
| Default Preset deletion | The preset designated as the default cannot be deleted until the default is reassigned to another preset. |
FAQ
What happens if a user's role is not assigned to any preset?
The user will automatically see the Default Preset. Every organization should designate a Default Preset before enabling Filter Presets for users to ensure consistent coverage.
Can a preset be assigned to more than one role?
Yes. A single preset can have multiple roles assigned to it. For example, both an "Editor" role and a "Reviewer" role can share the same preset if their filter needs are the same.
Can a user belong to more than one role?
No. Each user is assigned to a single role in Tenovos, so there is no ambiguity in which preset a user receives.
Does hiding a filter attribute restrict access to assets tagged with that attribute?
No. Filter Presets are a UX configuration only. Removing an attribute from a preset's filter panel does not prevent users from accessing assets that use that attribute. For access control, use Tenovos Rights Management and Security Templates.
Will changes to a preset take effect immediately?
Yes. Changes saved to a preset are reflected the next time a user loads or refreshes the gallery view.
What does "Open filter by default" control?
This setting determines whether the filter panel is open or closed when a user first loads the gallery after the preset is applied to their role. After that initial load, the platform remembers the user's last choice in their browser. This setting only governs the first-time experience.
Can I control the order in which filter attributes appear?
Yes. Within each preset's Attributes tab, you can drag and reorder attributes using the handle on the left side of each row. The order set here is the order users will see in their filter panel.