Content administration
In Admin, the Content tab allows you to permanently delete or restore assets and shared links, and manage a variety of content options that are presented to users including Tiles, Asset Badges, and External Sources.
NOTE: Access to the Content tab is available to administrative users with the Content Management role privilege.
This guide provides information about the following pages in the Content tab:
- Recycle Bin. Permanently delete assets or restore them to the **Content**gallery.
- External Shares. Delete download links to asset ZIP files that have been externally shared.
- Transformations. Enable or disable the transformations that are available to users.
- Locked Assets. View all locked assets and unlock them.
- Tiles. Manage shortcuts that appear on the Home page.
- Asset Badges. Manage badges that indicate asset and collection status.
- Request Inbox. Configure the columns displayed in the Request inbox.
- Getty Images. Define the content users will see when searching Getty Images.
- External Sources. Define external sources/webpages.
- Publishing. Connect and manage your YouTube publishing channels.
- Asset Presets. Configure default presets for a seamless upload experience.
Admin > Content tab:

Recycle Bin
In Admin > Content, the Recycle Bin page allows administrators to review deleted assets and permanently delete them or restore them to the Content gallery. Assets in the Recycle Bin are not accessible from the Content gallery.

The Recycle Bin page displays the following information about each asset:
- File Name. Name of the deleted asset.
- Deleted Date. Date when the asset was deleted.
- Deleted By. Name of the user who deleted the asset.
- Role. Role of the user who deleted the asset.
- Security Template. Security template(s) applied to the asset.
Display the Recycle Bin page
To view the Recycle Bin page, go to Admin > Content > Recycle Bin. The Recycle Bin page is displayed.
Search for deleted assets
On the Recycle Bin page, you can search for assets by name, the deleting user, or both.
Search by asset name
To search for an asset by name:
- Click the Search deleted assets search box and enter the asset’s filename.
- Searches are not case sensitive.
- As you type, the Recycle Bin page updates to display assets whose filenames include the text you are entering.
- To narrow the search results, you can Filter by Deleting User.
Search by deleting user
To search for an asset by deleting user:
- Click the Filter by deleting user search box and select the user from the list. You can also search for the user’s name.
- Searches are not case sensitive.
- You can filter by multiple deleting users.
- To narrow the search results, you can Search deleted assets.
Restore deleted assets
Assets in the Recycle Bin can be restored to the Content gallery.
To restore deleted assets:
-
In Admin > Content > Recycle Bin, search for the assets to restore, then select their checkboxes.
To select all assets in the Recycle Bin list, select the checkbox next to the File Name column heading.
-
Click Restore.
NOTE: The Restore and Delete options appear after you select one or more assets in the Recycle Bin asset list.

-
At the confirmation prompt, click Yes, Restore to confirm the restoration. The assets are restored to the Content gallery and a confirmation message appears.
To cancel the restoration, click Cancel or close the window.
Permanently delete assets
Assets can be permanently deleted. Permanently deleted assets are removed from the Recycle Bin and become unrecoverable.
To permanently delete assets:
-
In Admin > Content > Recycle Bin, select the checkboxes of the assets you want to permanently delete.
To select all assets in the Recycle Bin, select the checkbox next to the File Name column heading.
-
Click Delete.
NOTE: The Restore and Delete options appear after you select one or more assets.
-
At the confirmation prompt, click Delete to confirm the deletion. The assets are permanently deleted, and a confirmation message appears.
To cancel the deletion, click Cancel or close the window.
External shares
In Admin > Content, the External Shares page is where administrators manage the download links to externally shared ZIP files. These links and ZIP files are generated when users share assets via the Share or Transformations options.

The External Shares page provides the following information about each external share:
- Share. Link to download the ZIP file of assets.
- Shared By. User who shared the assets.
- Shared To. Email address to which the email was sent.
- Shared Date. Date when the assets were shared.
- Expiry Date. Date when the link to download the assets expires.
Display the External Shares page
To view the External Shares page, go to Admin > Content > External Shares. The External Shares page is displayed.
Search external shares
You can search for specific external shares. Tenovos searches all columns in the External Shares page for matches to the text you enter in the Search External Shares search box.
To search for an external share:
-
In Admin > Content > External Shares, click in the Search External Shares search box and enter the text you are searching for.
As you type, the External Shares list updates to display shares with text in any column that matches the text you entered.
Download assets from an external share
Administrators can download the ZIP file of assets from any externally shared link.
To download assets from an external share:
-
In Admin > Content External Shares, click the download link in the Share column.
The ZIP file of externally shared assets is saved to your default downloads folder. The default name is download.zip, but users can specify a different name when they share the assets.
Delete links to externally shared assets
Download links to externally shared assets expire one week after they are created. From Admin > Content > External Shares, administrators can delete the shared links at any time. Users attempting to access deleted links are notified that the link has expired and the files are no longer available.
To delete external shares:
-
In Admin > Content > External Shares, select the check box of one or more externally shared download links.
To select all external shares, click the checkbox next to the Share column heading.
-
Click Delete.
NOTE: The Delete option appears after you select one or more external shares.
-
At the confirmation prompt, click Yes, delete to confirm the deletion. The external share is deleted, and a confirmation message appears.
To cancel the deletion, click Cancel or close the window.
Transformations
In Admin > Content, the Transformations page allows administrators to enable and disable the transformations that are available to users.

The Transformations page displays the following for each transformation:
- Toggle. Enable or disable the transformation for users.
- Transformation Name. Name of the transformation.
- MIME Type Name. File formats supported by the transformation. These are the MIME subtypes.
- Transformation Description. Description of the transformation.
- MIME Type Group. The category under which the MIME subtype falls, such as “Image” or “Video.”
Display the Transformations page
To view the Transformations page, go to Admin > Content > Content Transformations. The Content Transformations page is displayed.
Search transformations
You can search for specific content transformations. Tenovos searches the Transformation Name column for matches to the text you enter in the Search Transformations search box.
To search for a content transformation:
-
In Admin > Content > Transformations, click in the Search Transformations search box and enter the transformation name you are searching for.
As you type, the Content Transformations list updates to display transformations names that contain the text you entered.
Enable and disable content transformations
In Admin > Content > Content Transformations, you can enable and disable the transformations that are available to users.
In the transformations list, a green toggle switch indicates the transformation is enabled and available to users. A gray switch indicates that the transformation is disabled.
To enable or disable a transformation:
- In the Transformations page, click the toggle switch next to the transformation name.
- A green toggle switch indicates the transformation is enabled and available to users.
- A gray switch indicates that the transformation is disabled.
Locked assets
In Admin > Content > Locked Assets, the Locked Assets page allows you to view locked assets and unlock them. If no assets are locked, Tenovos displays a message that the locked assets list is empty.

The Locked Assets page displays the following information about each locked asset:
- File Name. Name of the locked asset.
- Locked Date. Date the asset was locked.
- Locked By. Name of the user who locked the asset.
- Lock Type. Why the asset was locked, for example, “Proofing” or “Metadata.”
- Object ID. ID of the locked asset.
Display the Locked Assets page
To view the Locked Assets page, go to Admin > Content > Locked Assets. The Locked Assets page is displayed.
Search locked assets
You can search for locked assets. Tenovos searches all columns in the Locked Assets page for matches to the text entered in the Search Locked Assets search box.
To search for a locked asset:
In Admin > Content > Locked Assets, click in the Search Locked Assets search box and enter the text you are searching for. As you type, the Locked Asset list updates to display locked assets with text in any column that matches the text you entered.
Unlock assets
To unlock assets:
-
In Admin > Content > Locked Assets, select one or more locked assets by clicking checkboxes next to each asset’s file preview.
To select all locked assets, select the checkbox next to the File Name column heading.
-
Click Unlock.
NOTE: The Unlock option appears after you select one or more assets.

-
At the confirmation prompt, click Unlock. The assets are unlocked and removed from the Locked Assets page and a confirmation message appears stating that the assets have been successfully unlocked.
To cancel the restoration, click Cancel or close the window.
Tiles
In Admin > Content > Tiles, the Tiles page allows you to manage shortcuts on the Tenovos Home page. Tile shortcuts help users find relevant content quickly. They are configurable elements that navigate users to different areas in Tenovos, including an asset, collection, saved search, story board, or a web address.
A tile can be a square, a square with rounded corners, or a circle. It can display either an image or text. If using an image, the best are square images, 304 x 304 pixels or larger.
Display the Tiles page
To view the Tiles page, go to Admin > Content > Tiles. The Tiles page is displayed.
About the Tiles page
Admin > Content > Tiles:
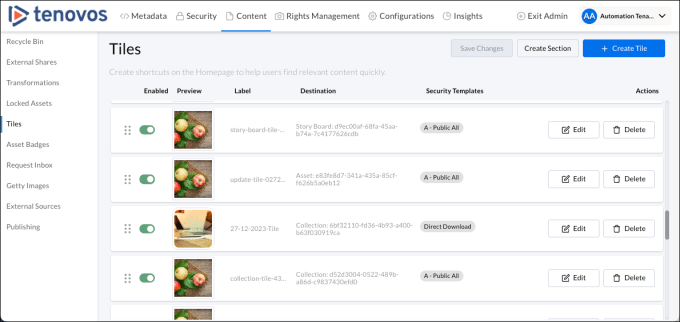
In Admin > Content, the Tiles page includes the following options:
(1) Drag and drop. Reorder the tile position on the Tenovos Home page.
(2) Enabled. Toggle the tile display on the Home page.
(3) Preview. The tile image displayed on the Home page.
(4) Label. The tooltip for the tile. If an image is not supplied for the tile, this text is used.
(5) Destination. The Asset, Collection, Search, Story Board, or the web address for a URL Destination Type.
(6) Security Templates. The template(s) which control the roles that can see this tile.
(7) Edit. Modify the tile definition.
(8) Delete. Delete the tile definition.
(9) Save Changes. Save changes to repositioned tiles.
(10) Create Section. Organize your tiles in sections.
(11) Create Tile. Create a new tile definition.
Create a tile
To create a tile:
-
In Admin > Content > Tiles, click Create Tile. The Create Tile window opens at its Destination screen.

Set the destination
-
Select a Destination Type—either an Asset, a Collection, private saved Search, a Story Board, or a URL.
The screen updates to match your selection. For example, if you choose Collection as a Destination Type, the screen updates so you can scroll to or search for a collection.

-
Scroll to or search for and select the Destination Value—either an Asset, a Collection, private saved Search, or a Story Board. If you chose URL as the Destination Type, enter the web address.
Configure the tile appearance
-
Click Next to configure the tile Appearance.
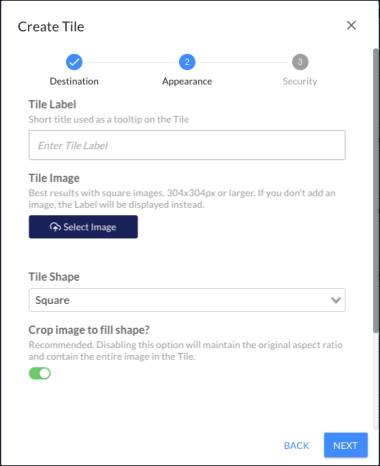
-
For the tile appearance, specify the following:
-
Tile Label. (Required.) Used as a tooltip for the tile.
-
Tile Image. Click Select Image to choose your tile image.
The best results are square images, 304 x 304 pixels or larger. If you do not add an image, the Tile Label text will be displayed instead. If you add an image, it will be uploaded to Tenovos.
-
Tile Shape. Either Square, Rounded, or Circle.
-
Crop image to fill shape? This is recommended. Disabling this option will maintain the original aspect ratio and contain the entire image in the tile.
-
Select the security templates
-
Click Next to select one or more Security Templates. The security templates control which roles can see this tile.

-
Click Save. The new tile is created and added to the list of tiles on the Tiles page.
If you uploaded an image for the tile, you will see a message that “Assets have been successfully uploaded.” It will be available in the Content gallery with the metadata template “Tiles.”

Reorder tiles on the Tenovos Home page
On the Tenovos Home page, tiles are displayed from left to right, as listed in the Admin > Content > Tiles list, from top to bottom.
To re-order the tiles displayed on the Home page:
-
In Admin > Content > Tiles, click, press, and hold a tile’s dot icon. Then drag the tile row to its new location.
Note that in the Tiles screen, Save Order is enabled after you move a tile definition.
-
Continue re-ordering the tiles as necessary.
-
Click Save Changes.
Tenovos saves the new tile order and displays a confirmation message.

Display a tile on the Tenovos Home page
When you create a tile, it is disabled by default.
To enable and display a tile on the Home page:
-
Go to Admin > Content > Tiles.
-
Scroll to the tile definition and click its Enabled toggle.
- Green toggle. The tile is displayed on the Home page.
- Gray toggle. The tile is not displayed on the Home page.
Edit a tile
To edit a tile definition:
-
In Admin > Content > Tiles, locate the tile entry and click its Edit. The Edit Tile window appears.

-
Make your changes to the Destination, Appearance, and/or Security pages, then click Save.
Delete a tile
To delete a tile definition:
-
In Admin > Content > Tiles, locate the tile definition and click Delete.
The Delete Tile confirmation prompt appears.

-
Click Delete to confirm the deletion request. The tile is removed from the Home page and from the Tile definition list.
To close the confirmation prompt and retain the tile definition, click Cancel.
NOTE: An administrator can restore the tile from the Recycle Bin.
Tile Sections
In Admin > Content > Tiles, you can organize groups of tiles into one or more sections via drag and drop. The groups appear to users as collapsible sections on the Home page.
After you create a tile section, you add tiles to it. Sections appear on the Home page when at least one tile in the section is enabled for display.

Create a tile section
To create a tile section:
-
In Admin > Content > Tiles, click Create Section. The new tile section window opens.

-
Enter a title for the new section then click OK to close the window. The new section is added to the bottom of the list on the Tiles page.

-
Drag and drop the section to the desired location, add the applicable tiles, then click Save Changes to save all your edits in the Tiles page.
Sections appear on the Home page when at least one tile in the section is enabled for display.
Edit a tile section
You can move a tile section and change its name.
- To move a tile section, drag and drop it to the desired location in the Admin > Content > Tiles page. Then click Save Changes to save your edits.
- To change the name of a tile section, click Edit to open its section title window. Modify the name as necessary, then click OK to close the window. Then click Save Changes to save your edits.
Delete a tile section
To delete a tile section:
-
In Admin > Content > Tiles, locate the section to delete and click Delete. The section is removed from the list.
-
Click Save Changes to save all your edits in the Tiles page.
Asset badges
In Admin > Content > Asset Badges, the Asset Badges page allows you to manage badges for assets and collections
Asset badges are indicators that appear asset previews and collections that meet the badge criteria. They help users quickly identify the status of an asset or collection. For example, a badge can visually indicate if an asset or collection is expired, published to external systems, etc.
Each badges can be triggered by a metadata attribute combined with an applicable operator (such as “Equals” or “Contains”), and can be customized with a unique color, icon, and label.
NOTE: To enable this feature, please contact Tenovos Customer Success.
Badges are displayed on collections and asset previews in all Content gallery view types, and in the Home, Cart, and Asset Details pages. They appear in the lower-right corner of asset previews. If there are more than three badges, a More menu provides a full list of all badges.
Asset badges and More menu:

Display the Asset Badges page
To view the Asset Badges page, go to Admin > Content > Asset Badges. The Asset Badges page is displayed.
About the Asset Badges page
Admin > Content > Asset Badges:
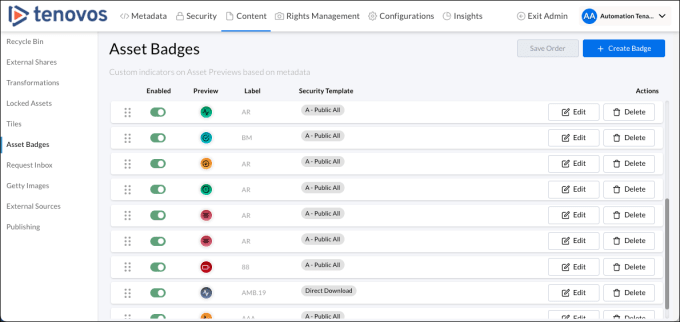
In Admin > Content, the Asset Badges page includes the following options:
(1) Drag and drop. Reorder the asset badge definition in the list.
(2) Enabled. Toggle the asset badge display.
(3) Preview. The selected asset badge icon.
(4) Label. The name displayed for a badge in the asset preview.
(5) Security Template. The template(s) which control the roles that can see this asset badge.
(6) Edit. Modify the asset badge definition.
(7) Delete. Delete the asset badge definition.
(8) Save Order. Save changes to asset badge list order.
(9) Create Badge. Create a new asset badge definition.
Create an asset badge
When you create an asset badge, you will select a trigger, configure the badge appearance, and select the security template(s).
To create an asset badge:
-
In Admin > Content > Asset Badges, click Create Badge. The Create Badge window opens at its Trigger screen.

Select a trigger
-
Select a Trigger Attribute. This is the metadata attribute that triggers the badge.
-
Select a Trigger Operator. The available operators are based on the metadata attribute selected in the preceding step.
Possible operators are Equals, In, Contains, Does Not Equal, Not In, Does Not Contain, Between, Not Between, Before, and After.
NOTE: For multi-select attributes like “Security Templates”, IN should be used rather than EQUALS.
For dates, BEFORE and AFTER do not include today’s date. All dates are treated as the beginning of the day.

-
Specify the Trigger Value. The available values are dependent on the Trigger Operator selected in the preceding step. For example, a Trigger Attribute of “Due Date” could have a trigger value of “Between 30 and 90 days from now.”
Configure the asset badge appearance
-
Click Next to configure the tile Appearance.
An asset badge can display an icon, label, and custom color.

-
For the asset badge appearance, specify the following:
- Badge Label. The name displayed for a badge in the asset preview.
- Badge Color. The color of the asset badge. Select from Popular Colors or set a custom color.
- Badge Icon. (Optional.) Enter a single letter or select an icon in the Feather icon library.
Select the security templates
-
Click Next then select one or more Security Templates.
In the same way security templates restrict who can view an asset, badge security templates restrict who can view a badge. If two users are assigned to different groups, they may see different badges based on their security permissions.
- The selected security template(s) apply to the badge itself.
- The security templates do not affect the assets to which a badge is applied.

-
Click Save. The new asset badge is created and added to the list of badges on the Asset Badges page.
Reorder tile definitions on the Asset Badges page
To re-order the tile definitions on the Asset Badges page:
-
In Admin > Content > Asset Badges, click, press, and hold a badge definition’s dot icon. Then drag the badge row to its new location.
NOTE: In the Asset Badges screen, Save Order is enabled after you move an asset badge definition.
-
Continue re-ordering the badges as necessary.
-
Click Save Order.
Tenovos saves the re-organized asset badge list and displays a confirmation message.
Edit an asset badge
To edit an asset badge definition:
-
In Admin > Content > Asset Badges, locate the asset badge entry and click Edit.
The Edit Asset Badge window appears.

-
Make your changes to the Trigger, Appearance, and/or Security pages, then click Save.
Delete an asset badge
To delete an asset badge definition:
-
In Admin > Content > Asset Badges, locate the asset badge entry and click Delete.
The Delete Badge confirmation prompt appears.
-
Click Delete to confirm the deletion request. The badge is removed from the asset badge definition list.
To close the confirmation prompt and retain the tile definition, click Cancel.
NOTE: An administrator can restore the asset badge from the Recycle Bin.
Request Inbox
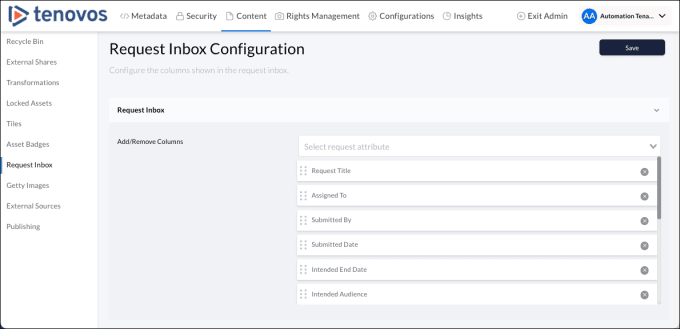
In Admin > Content > Request Inbox, you can manage the columns that are displayed in a reviewer's Requestinbox. This includes adding, deleting, and reordering the columns.
Users with the Requests Inbox and Request Management privileges use the Requestinbox to review asset upload and download requests.
Admin > Content > Request Inbox:
Add a Request inbox column
Admin > Content > Request Inbox presents a list of all columns currently displayed in a reviewer's Request inbox.
To add a column to the Request inbox:
-
In Admin > Content > Request Inbox, expand the Request Inbox dropdown.
-
In Select request attribute, scroll or type to locate a column heading. Then click it to add it to the column list.
By default, the new attribute is placed at the bottom of the list of currently active attribute columns. It will appear as the rightmost column in the Request inbox.
To change its location in the inbox, drag it to a different position in the list of active columns.
-
Click Save to confirm your changes.
Delete a Request inbox column
Admin > Content > Request Inbox presents a list of all columns currently displayed in a reviewer's Requestinbox.
To remove a column from the Request inbox:
-
In Admin > Content > Request Inbox, expand the Request Inbox dropdown.
-
In the list of currently active inbox columns, locate the attribute you want to delete. Then click its X to delete it.
-
Click Save to confirm your changes.
Reorder Request inbox columns
Admin > Content > Request Inbox lists the columns currently displayed in the Request inbox. Attributes at the top of the list appear as the leftmost columns of the Request inbox.
To reorder columns in the Request inbox:
-
In Admin > Content > Request Inbox, expand the Request Inbox dropdown.
-
Locate the column you want to move, then click and drag its drag icon and move it to the the new position.
-
Click Save to confirm your changes.
Getty Images
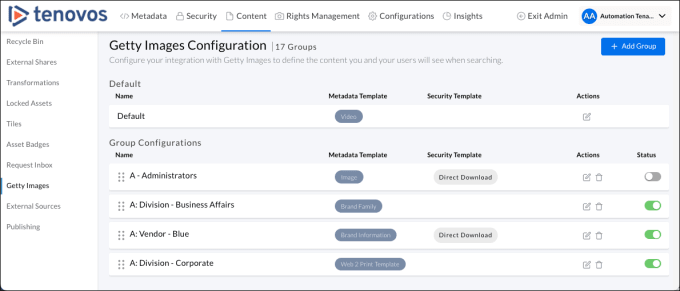
In Admin > Content > Getty Images, the Getty Images Configuration page allows you to manage your Getty Images integration. You can manage the user groups that can access Getty Images and the content they will see when searching.
Admin > Content > Getty Images:
Add a Getty Images access group
To add a Getty Images access group:
-
In Admin > Content > Getty Images, click Add Group.
-
Search for or scroll to and select a security group, then click Add.
-
Click Add.
-
In the Credentials section, add an API Key and Secret.
-
Choose a Default Sort By. Either Best Match, Newest, or Most Popular.
-
Enable or Disable filter options including:
- Exclude Editorial Use Only
- Embeddable Images
- Exclude Nudity
-
In the Templates selection, select a Metadata Template and one or more Security Templates.
-
Click Save.
Delete a Getty Images access group
To delete a Getty Images access group:
-
In Admin > Content > Getty Images, locate the group you want to delete in the Group Configurations section.
-
Click Delete.
-
Click Yes, delete to confirm.
Edit a Getty Images access group
To edit a Getty Images group:
-
In Admin > Content > Getty Images, locate the group you want to edit in the Group Configurations section.
-
Modify the API Key, Secret, Default Sort By, Filters, and Templates, as necessary.
-
Click Save.
Enable/disable a Getty Images access group
To enable or disable a Getty Images group, navigate to Admin > Content > Getty Images > Group Configurations and toggle its Status.
Reorder the Group Configuration display
To reorder Getty Images groups in Admin > Content > Getty Images > Group Configurations, click and drag a group's drag icon to a new location.
External Sources
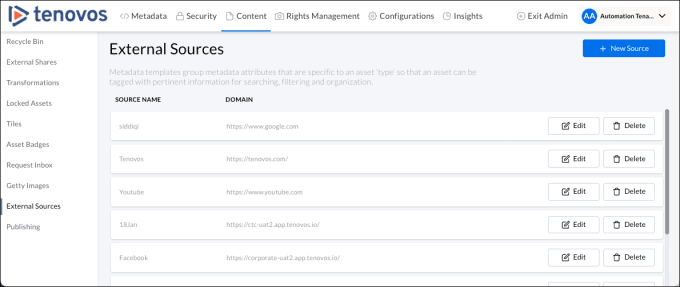
Admin > Content > External Sources allows you to display external sources/webpages in Tenovos. Users can use Home page tiles to navigate to external sources.
Admin > Content > External Sources:
Add an external source
To add an external source:
-
In Admin > Content > External Sources, click New Source.
-
Fill out the New Source popup with a Source Name, Integration Type, Domain URL, and Secret Key.
-
Click Save to add the new source.
Delete an external source
To delete an external source:
-
In Admin > Content > External Sources, locate the source you want to delete and click Delete.
-
At the confirmation prompt, click Delete.
Edit an external source
To edit an external source:
-
In Admin > Content > External Sources, locate the source you want to edit and click Edit.
-
Modify the Source Name, Integration Type, Domain URL, or Secret Key, as necessary.
-
Click Save to confirm your edits.
Publishing
In Admin > Content > Publishing, the Publishing page allows you to manage your publishing channels.
For customers with Publish to YouTube enabled, authorized users can publish Tenovos video assets to selected YouTube channels and with the specified privacy status—Public, Private, or Unlisted. Tenovos tracks, captures, and presents data about a successful and unsuccessful Publish action, including the YouTube URL for the successful publication.
Publishing a video asset to YouTube requires connecting Tenovos to a YouTube channel, publishing to that channel, and then verifying that the video was published as expected.
YouTube channels are enabled in Tenovos by authenticating one or more YouTube accounts, then granting access to one or more privacy statuses to individual users.
Admin > Content > Publishing:
When users publish a video asset, the source video is sent directly to YouTube, via a “job.” To publish videos to YouTube, users must provide the same required information that would be entered on YouTube.com: title, description, tags, language, channel, and privacy status. Users are then informed via the Jobs page if the publication status is “In Progress,” “Failed,” or “Succeeded.”
The ability to publish assets to the YouTube service is regulated by the Channel Publish role privilege and Download asset permission.
After an asset has been published to YouTube, the video’s URL, Channel, Privacy Status, and the name of the user who published it is added to the asset, in a non-editable metadata table. The captured data can be presented via Asset Badges and is available in Content gallery for searching and filtering, and via the Channel Info metadata group in Asset Details.
NOTE: For more details about assets and YouTube, see Publishing to YouTube.
To connect Tenovos to a YouTube channel and publish a video asset to YouTube:
-
Connect Tenovos to a YouTube channel.
Administrators with the Channel Admin privilege can connect Tenovos to YouTube account(s) and subsequently the channels associated with an account.
A. In Admin > Content > Publishing, click Connect Account/Resync.
B. Provide sign-in information for your Google Account.
C. Message “Successfully connected to YouTube” is displayed and the new Tenovos channel(s) are added to the Content > Publishing list.
For more details, see Connect Tenovos to a YouTube channel.
-
Publish a video to YouTube.
Users with the Channel Publish privilege, Download permission on the video assets they want to publish, and who are assigned to a given channel can publish videos to that channel.
A. Go to Asset Details for a video asset.
B. Click Publish to YouTube.
C. Complete the Publish to YouTube form with YouTube video details.
-
Verify video publication.
A. Go to the Jobs page and locate the publishing job.
B. Click View Results to open the Publish Report window.
C. Click the video URL.
D. Confirm that the video is in the correct YouTube channel and with the specified privacy settings.
-
Track video assets published to YouTube.
A. Go to the Jobs page and locate the publishing job.
B. View the video’s Asset Details.
C. Use asset badges.
D. Filter or search for published assets.
Display the Publishing page
To view the Publishing page, go to Admin > Content > Publishing. The Publishing page is displayed.
About the Publishing page
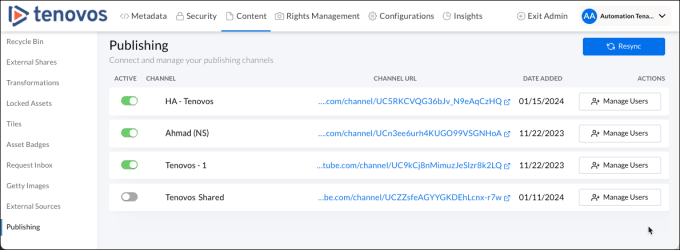
Admin > Content > Publishing:
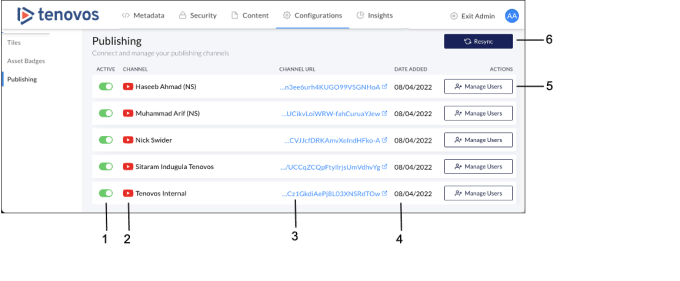
In Admin > Content, the Publishing page includes the following options:
(1) Active. Enable or disable a Tenovos publishing channel.
(2) Channel. The connected YouTube channel.
(3) Channel URL. The YouTube channel URL.
(4) Date Added. The date the channel was connected to Tenovos.
(5) Actions. Grant or remove the ability to publish to the YouTube channel.
(6) Connect Account/Resync. Connect or resync YouTube channels with Tenovos.
Required permissions
The ability to publish to YouTube from Tenovos requires three permissions—Channel Admin, Channel Publish, and Download permissions.
-
Channel Admin privilege
The Channel Admin privilege gives administrators access to the Admin > Content > Publishing page where they can manage channels and their users. With this privilege, administrators can connect Tenovos and YouTube accounts/channels. For a connected YouTube account/channel, administrators can grant publishing rights to other administrators and/or publishers by adding them to one or more of the channel’s privacy statuses—Public, Private, and Unlisted.
Users who have the Channel Admin privilege and are added to at least one of the publishing channel’s privacy statuses can also manage that channel in Tenovos, regardless of who originally connected the YouTube account/channel to Tenovos.
NOTE: Granting permissions to publishing channels in Tenovos does not update permissions in their respective channels in YouTube.
-
Channel Publish privilege
The Channel Publish privilege allows end-users to publish to a channel. A user must also be assigned to at least one channel to be eligible for publish actions.
-
Download permission
Users must have Download permission on a given asset to be able to publish it to YouTube.
No additional permissions are required.
Supported video file types for publishing to YouTube
Tenovos supports all file types supported by Youtube.com. This includes, but is not limited to, .MP4, .MOV, .AVI, and .WMV.
For a list of all file types supported by YouTube, see YouTube Help’s list of supported file formats.
Connect Tenovos to a YouTube channel
In Admin > Content > Publishing, use Connect Account/Resync to authorize Tenovos access to a specific YouTube account and its associated channel(s). The ability to connect Tenovos to YouTube requires the Channel Admin privilege.
NOTE: When there are no connected YouTube accounts, the Publishing page displays Connect Account. When there are one or more YouTube connection(s), Resync is displayed.
Administrators with the Channel Admin privilege can connect Tenovos to YouTube account(s) and subsequently the channels associated with an account.
To connect Tenovos to a YouTube channel:
-
Navigate to Admin > Content > Publishing.

-
Click Connect Account/Resync to open the Google Account consent form.
NOTE: When there are no connected YouTube accounts, the Publishing page displays the Connect Account. When there are one or more YouTube connection(s), the Resync is displayed.

-
Accept the access settings. A message “Successfully connected to YouTube” is displayed and the channel is added to the Admin > Content > Publishing list.

Add users to a Tenovos publishing channel
To add a user to a Tenovos publishing channel:
-
In Admin > Content > Publishing, locate the publishing channel and click Manage Users. The Add/edit users window for the channel opens.

-
Search for the user by name or email, set the user’s publishing settings—All, Unlisted, Public, and/or Private, then click Save.
Changes will affect those users immediately.
Remove users from a Tenovos publishing channel
To remove a user from a Tenovos publishing channel:
-
In Admin > Content > Publishing, locate the channel and click Manage Users. The Add/edit users window for the channel opens.
-
Locate the user, then click the user’s Delete.
Disable/enable a Tenovos publishing channel
Channels cannot be deleted, they can only be disabled. This preserves the data integrity of assets that may have previously been published to a given channel.
To disable or enable a Tenovos publishing channel:
In Admin > Content > Publishing, locate the channel and click Active to toggle a channel’s availability.
- Green. The channel is active.
- Gray. The channel is disabled
Publish a video to YouTube
For details about publishing a video asset to a YouTube channel, verifying the video publication, and tracking video assets published to YouTube, see Publishing to YouTube.
Asset Presets
In Admin > Content, the Asset Presets page allows you to configure asset rules based on specific user roles.
Asset Presets allow admin users to configure default metadata and security templates that are automatically applied when users in certain roles upload content, ensuring consistent content governance without manually assigning metadata and security.
Asset Presets only apply to uploads performed via Seamless Asset Ingest. Assets uploaded via the standard Upload UI will not use Asset Presets.
To Create a New Asset Preset
- Navigate to Admin > Content > Asset Presets.
- Click the 'Create Preset' button in the right hand corner. The user will be presented with a panel on the right hand side of the screen with the required fields for an asset preset.
- Complete the fields presented in the form.
- Preset Name: Name of the Asset Preset. Best practice is to name the preset based on a common uploading use case of the role(s) included in the preset (ie, Photographer Upload)
- Security Template: Security Templates that will be applied to the assets uploaded via the asset preset. Multiple Security Templates can be applied to a single Asset Preset.
- Metadata Template: Metadata Template that will be applied to the assets uploaded via the asset preset. The dropdown of available Metadata Templates will only be populated with templates that do not have required fields missing default values.
- Roles: The User roles that should be assigned this asset preset. Multiple roles can be assigned to a single asset preset, but a single role can not be assigned to multiple presets.
- Click Save. The newly created preset should now appear in the list of Asset Presets.
To Edit an Asset Preset
- Navigate to Admin > Content > Asset Presets.
- Locate the Asset Preset you would like to edit. Click the pencil icon on the right side of the corresponding preset row. The user will be presented with a panel on the right hand side of the screen with the fields and values for the preset.
- Make updates to the fields as necessary in the form.
- Preset Name: Name of the Asset Preset. Best practice is to name the preset based on a common uploading use case of the role(s) included in the preset (ie, Photographer Upload)
- Security Templates: Security Templates that will be applied to the assets uploaded via the asset preset. Multiple Security Templates can be applied to a single Asset Preset.
- Metadata Template: Metadata Template that will be applied to the assets uploaded via the asset preset. The dropdown of available Metadata Templates will only be populated with templates that do not have required fields missing default values.
- Roles: The User roles that should be assigned this asset preset. Multiple roles can be assigned to a single asset preset, but a single role can not be assigned to multiple presets.
- Click Save. The newly created preset should now appear in the list of Asset Presets.