Work with asset metadata
Metadata is information about your assets—it helps you understand, locate, and manage them more effectively.
In Tenovos, users with the appropriate permissions can:
- Edit Metadata for a single asset
- Bulk Edit metadata for multiple assets
- Export Metadata for one or more assets
- Export metadata for all assets
Editing asset metadata from the Content gallery or the Cart opens a metadata edit dialog. For a single asset, you can also choose to Edit Metadata or Export Metadata in its Asset Details.
This section explains how to edit and export asset metadata from inside Tenovos (also known as, "inline editing"). To edit and export asset metadata using only spreadsheets, see Bulk operations. For administrative information including how to create, configure, and manage metadata templates and their building blocks—groups, tables, cascades, attributes, and vocabularies see Metadata administration.
Edit metadata of a single asset
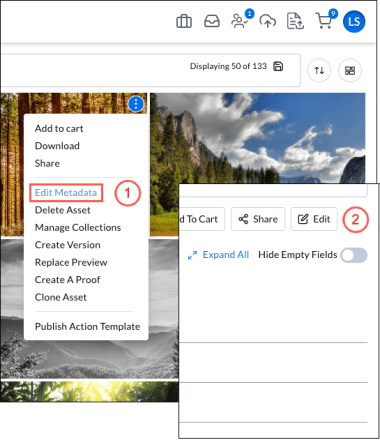
You can edit the metadata of a single asset from the Cart, Content gallery (1), or Asset Details (2).
To edit the metadata of a single asset:
-
Click Edit Metadata on the asset's context menu:
In the Content gallery or the Cart, open the asset’s context menu and click Edit Metadata. The metadata dialog opens with the name of the asset displayed at the top.Or from Asset Details, click Edit Metadata. The asset’s metadata changes from read-only to editable (2).
-
Edit the metadata attributes:
-
Update the Security Template(s) or Metadata Template.
cautionIf you change the asset metadata template, all data for attributes that are not associated with the new metadata template will be removed.
-
Modify the editable text, dropdown list selections, or date fields.
-
System Metadata and Technical Information attributes cannot be modified from these screens.
-
Use the arrows to move to the previous or next asset in the Content gallery.
-
Toggle Show Required Only to show all attributes or only required attributes.
-
Toggle Preference View to show or hide the metadata attribute groups you configured in User Preferences.
-
-
Save edits.
Click Continue to accept and save your edits.
Bulk edit asset metadata
You can edit the metadata of multiple assets at once in a Collection, the Cart, or the Content gallery.
In the task bar menu, the Bulk Edit option is available when all selected assets share the same metadata template. To bulk edit assets with different metadata templates—so that you can apply the same metadata template to all—you must use Bulk Edit All for assets in a collection.
After you select assets and choose Bulk Edit, a Bulk Edit window opens. This window displays the number of selected assets in the title bar ("1" in the following screenshot) and the applied Metadata Template ("2" in the screenshot). No other metadata values are presented; all existing values will be overwritten by the new values you provide.
NOTE: For Bulk Edit All, the Bulk Edit dialog displays the number "1" at the top. This indicates that you have selected all the assets in the current collection.
When you edit asset metadata in bulk:
- Changing the applied metadata template will remove data for attributes that are not associated with the new metadata template.
- Assets that are missing data for required attributes will not be updated. Before you Save your changes, confirm that you have completed all required fields.
Bulk Edit dialog:

To bulk edit asset metadata:
-
Select the assets:
In a Collection, the Cart, or the Content gallery, select the assets then open the task bar menu and select Bulk Edit or Bulk Edit All (available in a collection). The Bulk Edit dialog opens.NOTE: To use Bulk Edit, the assets you select must have the same metadata template applied. If you select assets with a mix of metadata templates, the Bulk Edit option is not available. (If you are working with assets in a collection, you can use Bulk Edit All.)
-
(Optional.) Show Required Only:
Toggle Show Required Only to display all attributes or just the required ones.
💡 Tip Enabling Show Required Only helps ensure that you fill in all required fields. Assets missing data for required attributes won't be updated. -
Update the templates:
Update the Security Template(s) or Metadata Template.cautionChanging the metadata template will remove data for attributes not associated with the new template.
-
Edit metadata attributes:
You can Append, Replace, or Remove values for each attribute. These options are displayed for a field after you edit it.-
Append. Adds the new value to the existing value(s) for the asset.
-
Replace. Replaces the current value with the new value.
-
Remove. Deletes the value from the asset. The value you enter for removal must match the existing value exactly.
- The value you specify for removal must exactly match the existing full value in at least one of the selected assets. If it does not, the Remove request will be ignored.
- Related to the preceding requirement, you cannot Remove individual words from a text phrase.
For example, given a "Title" attribute with a text phrase value of "green fields", you cannot enter "green" and select Remove to get a value of only "fields". Tenovos will ignore that request.
NOTE: System Metadata and Technical Information attributes cannot be modified from this screen.
-
-
Save changes:
Click Save to accept and save your edits. The Bulk Edit window closes and Tenovos displays a message that the "Bulk edit process successfully started." Your request will be added to the job queue. -
Monitor progress:
Open the Jobs center to track the progress of your Bulk Edit job.- The job Type will be listed as "Bulk Edit."
- The Status will show as "In Progress," "Failed," or "Complete."
- Click the job Name to view all assets in the metadata bulk edit request.

Export metadata of one or more assets
You can export the metadata of one or more assets to an Excel file. The option to Export Metadata is available in the Content gallery, the Cart, a Collection, and Asset Details.
To export the metadata of one or more assets:
-
In the Content gallery, the Cart, or a Collection, select one or more assets then click Export Metadata in the task bar.
If you are viewing the Asset Details of a single asset, click Export Metadata.
-
Open the Jobs center to track your request.
-
When your In Progress job request is marked Complete, click its Save button.
-
Choose a destination location for the file, and click Save again.
-
The metadata will be exported to an Excel file, ready for review.
- The requested metadata will be divided into tabs, each labeled with the same name as each asset's applied Metadata Template.
- A _Vocabulary tab lists the controlled vocabularies for the selected assets.
- A _Missing tab reports any assets that were deleted by other users while you were exporting their metadata.
Export metadata of all assets
You can export metadata for all assets when viewing a Collection, the Cart, or filtered/search results in the Content gallery.
NOTE: In the Content gallery , the Export Metadata All option appears in the task bar after you apply a filter or perform a search and then select at least one asset.
To export the metadata of all assets:
-
In a Collection, the Cart, or the Content gallery, or filtered/search results, select any asset then click Export Metadata All in the task bar.
NOTE: In the Content gallery , the Export Metadata All option appears in the task bar after you narrow down the gallery assets with a filter or a search.
-
Open the Jobs center to track the status of your request.
-
When your In Progress job request is marked Complete, click its Save button.
-
Choose a destination location for the file, and click Save again.
-
The metadata will be exported to an Excel file, ready for review.
- The requested metadata will be divided into tabs, each labeled with the same name as each asset's applied Metadata Template.
- A _Vocabulary tab lists the controlled vocabularies for the selected assets.
- A _Missing tab reports any assets that were deleted by other users while you were exporting their metadata.
Copy and Paste Metadata in Tenovos
The Copy and Paste feature in Tenovos allows users to efficiently transfer metadata from one asset to multiple assets. This functionality is particularly useful for applying consistent metadata across a large number of assets, enhancing organization, data consistency and searchability.
Step 1: Copy Metadata from a Source Asset
From Gallery View
- Locate the asset from which you want to copy metadata from and click the kabob menu.
- Within the kabob menu, select 'Copy Metadata'. If the asset contains empty attributes, the user will need to choose whether or not those attributes should be included in the clipboard.
- A confirmation message will appear, indicating that the metadata has been copied to your clipboard.
From Asset Details Page
- Locate the asset from which you want to copy metadata from and open the asset details page.
- If you are using the legacy asset details page, click the kabob menu, and select 'Copy Metadata'. If you are using the new asset details page, navigate to the metadata tab and click the copy icon. If the asset contains empty attributes, the user will need to choose whether or not those attributes should be included in the clipboard.
- A confirmation message will appear, indicating that the metadata has been copied to your clipboard.
Assets with required fields missing metadata values cannot be copied.
Step 2: Activate Metadata to Paste
Once metadata has been copied, a red badge will display on the top right corner of the clipboard icon in the navigation menu, indicating that metadata has been copied to the clipboard. Although the clipboard is populated with metadata, it does not mean that all of the metadata in the clipboard will be pasted. This is where it is important to activate only the metadata you want to paste. Users can choose whether they want to activate all the metadata, just specific metadata groups or just specific metadata attributes.
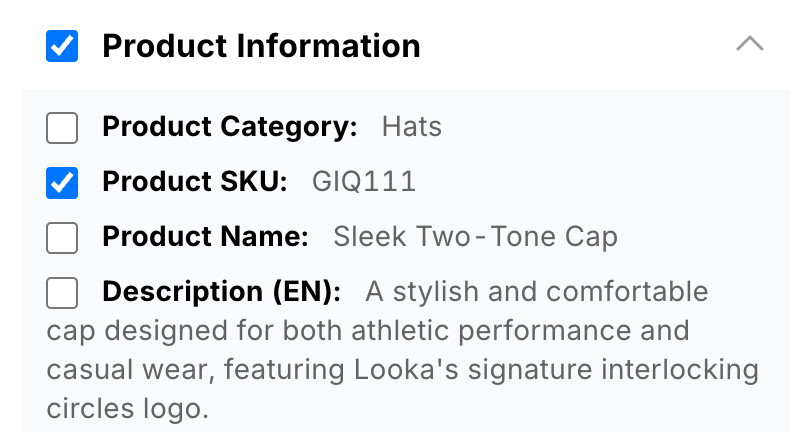
To activate a metadata group in clipboard, check the box next to the metadata group.
To activate only specific metadata attributes in clipboard, expand the metadata group the attribute belongs to and then check the box next to the metadata group.
Step 3: Select Target Assets
- Navigate to gallery view and use filters or search functionality to locate the assets you wish to apply the metadata to.
- Select up to 200 assets by checking the boxes next to each asset, or by loading all the desired assets on the page and clicking 'Select All'.
Ensure that all selected assets are the most recent versions and share the same metadata template as the source asset. Metadata cannot be pasted to assets with different metadata templates or older versions.
Step 4: Paste Metadata to Selected Assets
- With your target assets selected, click on the kabob menu in the right hand corner of the gallery page and select 'Paste Metadata' from the list of available actions.
- If all selected assets are able to be pasted to, you will receive a confirmation notification that the metadata paste was successful. The assets that you pasted metadata to will now have the pasted metadata applied.
You cannot paste metadata to assets that you cannot edit, assets with a different metadata template, or non-recent asset versions.
Limitations
- Edit Permissions: You must have edit permissions for both the source asset and the target assets.
- Sensitive Metadata: Sensitive metadata attributes cannot be copied or pasted.
- Metadata Template Consistency: The target assets must have the same metadata template as the source asset.
- Asset Version: Metadata can only be pasted to the most recent version of an asset.
- Bulk Limit: You can paste metadata to a maximum of 200 assets at a time.
Error Review
- If for some reason you are unable to paste metadata to all/some of your selected assets due to a limitation noted above, you will receive a notification that metadata was not successfully pasted to specific amount of assets. Within that notification, there will be a button that says 'Review'. When this button is clicked, a new browser tab will open containing the paste error report. This will show you each asset that was not able to accept the pasted metadata, as well as the reason why. The purpose of this page is to assist in understanding the reason why a paste operation wasn't entirely successful.
Once this error review page is closed, it can not be opened again.
Understanding the Error Review Page

1. Copy Source Details: At the top of every error review page will be details about the source asset you copied your metadata from.
2. Paste Error Groups: Beneath the source details will be the reason(s) why the asset was not able to be pasted to - we call these the paste error groups. When a error is identified in a paste job, the error review page will identify each unique error as an error group. Within each error group will be the asset(s) that could not be pasted to because of that error.
3. Information Icon: Each asset, including the source asset, will have an information icon to the right of the asset thumbnail and filename. Clicking this icon will open an information panel, which will show different information based on which asset the icon is clicked from.
4. Asset Information Panel: When the Information Icon next to an asset is clicked, the asset information panel will open. The information panel will display different information depending on whether the icon next to the source asset is clicked, or if the icon next to an asset with errors is clicked.
- If the icon next to the source asset is clicked, the metadata that was activated in the clipboard will be displayed in the asset information panel.
- If the icon next to an asset with errors is clicked, the entire asset's metadata will be displayed in the asset information panel, allowing users to easily scan the metadata on the asset.
Best Practices
- Verify Template Consistency: Before initiating the paste action, ensure that all selected assets share the same metadata template as the source asset to prevent errors.
- Use Filters: Utilize filters to quickly identify and select assets that match the criteria for metadata pasting.
- Limit Asset Selection to 200 or less: To ensure performance and accuracy, limit the number of assets selected for metadata pasting to 200 at a time. If you attempt to paste to more than 200 assets at once, you will be asked to reduce your selection before proceeding.
FAQs
Q: Can I paste metadata to assets in different folders or collections? A: Yes, as long as the assets meet the criteria (same metadata template, most recent version, and editable).
Q: Can I copy the metadata of a sensitive attribute that I can't see?
A: If there is an asset that contains sensitive attributes that you don't have permission to see, you can copy the metadata from that asset, but the sensitive fields will not be copied to clipboard and will not be included when pasting.
Q: How long does the metadata stay in the clipboard?
A: The metadata remains in the clipboard until you clear your clipboard or browser cache is cleared.